
 Last modified:
Sunday, 06-Aug-2017 22:16:22 UTC. Maintained by: Elisa E. Beshero-Bondar
(eeb4 at psu.edu). Powered by firebellies. Last modified:
Sunday, 06-Aug-2017 22:16:22 UTC. Maintained by: Elisa E. Beshero-Bondar
(eeb4 at psu.edu). Powered by firebellies.
Last modified:
Sunday, 06-Aug-2017 22:16:22 UTC. Maintained by: Elisa E. Beshero-Bondar
(eeb4 at psu.edu). Powered by firebellies. Last modified:
Sunday, 06-Aug-2017 22:16:22 UTC. Maintained by: Elisa E. Beshero-Bondar
(eeb4 at psu.edu). Powered by firebellies.Server side includes (SSIs) permit us to create (boiler-plate) text in one place so that we can call it and reuse it as we wish in a set of web pages. We often use SSIs to make a header or footer or menu bar to be positioned in the same place on all of the pages across a project website. Where we might copy and paste that information on every new page we build on a site, that becomes tedious and brittle as our sites grow, and as we want to make a change to the organization of our site, say, to add a new item on a menu bar, or to change the format of our site logo. Instead, if you are working in a web server environment configured to accept SSIs, you can save the piece that will repeat on all your pages separately in its own file and tell the web server, with an SSI, to insert that file into all of your pages in the location you designate. If you later make a change to the file you call with your include, you just make the change in one place, the file to be inserted, and that change will propagate to all the pages with an actively configured SSI in place.
Here is an example of how to prepare a menu file in one place that you can use in all of your webpages on a site. To do this, you create a separate file that contains only the menu, which you upload to the server. This is not a complete file and on its own is not going to be valid HTML, but when it is included into another HTML file, it will need to be valid there (and not make the new page be invalid when the little include file is added). For example, a menu might look like:
Main | About | Texts | Analysis
and be coded as:
<hr/>
<p><a href="index.html">Main</a> | <a href="about.html">About</a> |
            <a href="texts.html">Texts</a> | <a href="analysis.html">Analysis</a></p>
<hr/>
Create this as a separate document and save it with its own filename, perhaps something
like menu.html
.
About the include file
:
include filedoes not have to be valid or well-formed HTML. For example, a boilerplate header might contain an
<hi> header and a
<p>, with no common root elements. That isn’t well-formed XML
or HTML (which requires that everything be wrapped in a single root element), but
it’s fine for a file to be included. The menu above contains three sibling elements,
two horizontal rule (<hr>) elements with a <p>
between them.<?xml that <oXygen/> creates at the beginning of regular
XML or XHTML files) or other HTML boilerplate. What you are creating is some
fragmentary HTML code; it is not an HTML page.include file
In each page where you want to insert your include file
(in our example, a menu
named menu.html
), insert the following line in the place in the document
where you want the inclusion to appear:
<!--#include virtual="menu.html" -->
This is an XML comment, but the hashtag makes it a special type of comment that will be understood by the web server as an instruction to insert the contents of some other file in place of the instruction. A few important details:
inc) under your main project directory, the value you would use is
inc/menu.html. You can put your files wherever you want, but you have to tell the system how to find them.
<!--) and the include instruction
(#include). There must be a space before the comment end
tag (-->).In order for server side includes to work on our newtFire server, we need to save all of
the files involved with the .html extension (not as .xhtml). That has
nothing to do with how the file is encoded under the hood, and is simply a matter of
what file extensions our server recognizes as appropriate for use with SSIs. Once you’ve
created the HTML file in which you want to insert your include file
, as well as
the include file
itself, (menu.html
in our example), upload them both to
your project directory on newtFire the way you usually upload files. If you have a
separate subdirectory for your included files, put the menu there and be sure that the
include instruction points to it. You will have to do one more thing to make sure that
your include is active:
By default the web server doesn’t process include instructions for all files, and
newtFire is configured to process include instructions only for files with a
.html extension. For your own future reference, how a server knows when to process
include instructions and when not to can vary from host to host, and it is something to inquire about if you set up web space elsewhere. Our newtFire server
is configured for your team project directoriees so that you need to set a special permissions configuration for the server to read SSI instsructions.
To do that for an HTML file that contains an inclusion instruction,
you need to set the x bit, which permits your file to execute a process (the including
of the HTML for your menu). When a user attempts to load a file with the x bit set, the
system knows that any include instructions inside it need to be processed. To do
that:
/var/www/html/projectdir.include file. Look at the permission attributes on your file in the space: most likely they are set to rw-r--r--, a sequence of nine characters that indicates the file permissions in three sets of three: The first three are for the owner of the directory, the second three are for the group sharing access to the directory, and the third three are for the public: They may be set to rwx for the maximum permission, where
rmeans
readfor reading access,
wmeans
writefor permission to write or upload files to the directory space, and the last is the x-bit, or the
x, which means
executeand this is the one we need to set for each class of user so that when the webpage in question loads, the server is told that regardless of who is accessing the page it is okay to execute a server instruction (our SSI) indicated in the comment tags within the page.
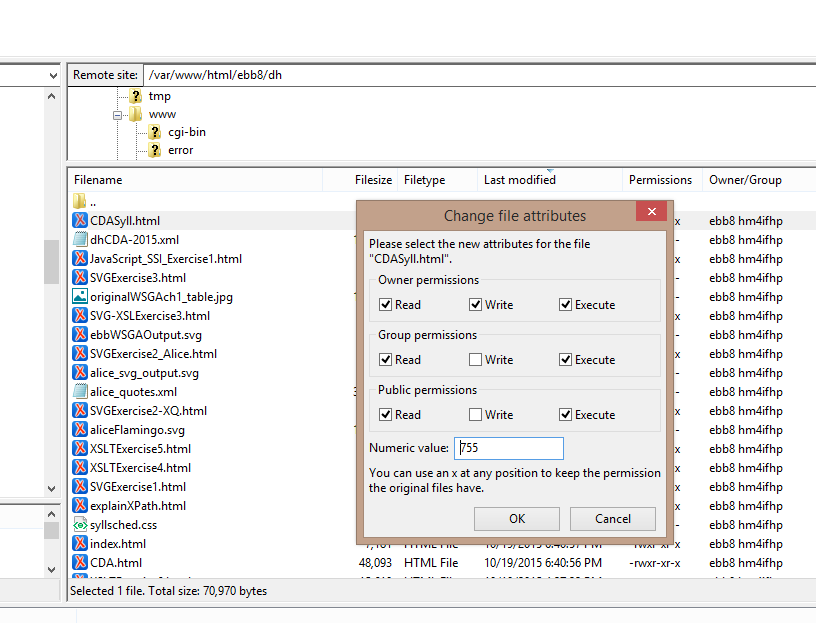
Executein Owner, Group, and Public permissions to set the x-bit which now permits the server to execute your SSI commands. Here is an screen capture from FileZilla showing how the permissions should be set:
Once you’ve uploaded the files, you can test the results by loading the page in a web browser. The text from the included file should appear in place of the include instruction.
The preceding strategy is fine when you type up your HTML directly in <oXygen/>, but how about when you use XSLT to generate the HTML? You can’t just write the include instruction like a literal result because the XSLT that does the processing will think (correctly) that it’s a comment, and won’t copy it into the output.
The way you work around this is with a comment constructor, along the lines of:
<xsl:comment>#include virtual="menu.html" </xsl:comment>
The preceding code tells the XSLT processor create an XML comment in the output at
this location, and set its contents to whatever the contents of the
.<xsl:comment> element might be
The main use we make of SSIs involves inserted HTML fragments, as in the menu example above, but SSIs have additional functionality, which you can read about at https://httpd.apache.org/docs/2.4/howto/ssi.html.